Tuesday, December 29, 2009

A Short Break..

I hope everyone had a wonderful Christmas and soon, New Years. My Christmas was very relaxing. I cleaned my room (which is already a disaster area again.. but with less dust) and watched Avatar in 3D. What a wonderful day it was...

Well, unfortunately my laptop is being fixed for the next month or so and I won't have access to Photoshop. Until I can find a way to edit the photos of the baked goods I make, I'll either have to revisit old pictures I've tucked away or maybe I'll surf the net for some fun and interesting things.

In the meantime, here are some photos that I took a few weeks ago for our seafood client.


Friday, December 25, 2009

Merry Christmas!

Merry Christmas everyone! Hope you all have a wonderful and blessed time celebrating the Lord's birth with your loved ones!

Tuesday, December 22, 2009

Christmas Tree, O Christmas Tree


Last Saturday I taught a couple of ladies from my church how to make decorated sugar cookies.

Here are a couple of pictures I took with my phone:


In preparation for this lesson I was doing some research on examples of decorated sugar cookies in shapes of stockings, Christmas Trees, Snowmen, etc. and I came upon some pictures of a 3D Christmas Tree made from different sized stars. I was so impressed at the wow-factor of this simple design I HAD to make some!

It just so happened that I had a star cookie cutter set that had 4 different sized stars. In total I used 5 different cutters (I had a mini star cutter that I added to the top).

At fist I did one of each star but I realized it was too short so I doubled each star. When I stacked them it looked awesome!

In total I used 10 cookies per tree. If you're going to make more than one... get ready to make
LOTS OF COOKIE DOUGH. I used 4 POUNDS OF BUTTER to make about 11 of these Christmas Trees.

(Click here for instructions on how to make royal icing.)

I outlined each cookie with a shell border and then sprinkled crystal sugar to make it look like snow.

To stack them, I didn't wait till the icing dried. I started stacking them right away mainly because I didn't have time but it was good because it acted as an additional glue to hold the tree together. You can wait till it dries hard but just
make sure you have A LOT OF ICING between the layers otherwise, it won't touch the other layers.

Get the biggest cookie and put a good amount of royal icing in the center.
Place the second biggest star on top.

Continue with the next biggest star.

Continue the process until you finish with the smallest star.

You can attach another star on top but I wrapped all of mine in cellophane and I knew it wouldn't stay well so I left it out.

Still looks great.


Thursday, December 17, 2009

Evan's First Birthday

I was honored to make some cupcakes for an adorable baby named Evan's first birthday.

In the Korean culture, a child's first birthday (also called Dol) is a HUGE deal. A party is thrown with an atmosphere not too far off from a wedding reception. I think it may have something to do with the low survival rate of babies hundreds of years ago. A smaller celebration would happen after the 100th day of a baby's life. Once the baby hits the 1 year mark, the chances of survival is pretty high.

He and his parents attend my church and are HUGE fans of the Red Velvet Cupcakes I make (I ended up making Blue Velvet!). I usually use this brown cupcake liner that I get at this gourmet restaurant supply store in Culver City called Surfas (I think it's now called The Culinary District.. I'm not sure what's going on). When I went to restock, I accidentally grabbed the black cupcake liners. Doh! So I had to go with the standard white. But it just didn't match well for the elegant theme of the birthday.

I had this genius idea to make my own cupcake liners! I'd bake off the cupcakes in a plain white liner then put it in a handmade liner I'd make with colors to match the theme! Little did I realize that this is not news to a lot of people.

It took me a while to figure out the general pattern that would fit the cupcake but I got it. It still needs a bit of work but it worked pretty well.


This is the back of a 12x12 card stock paper. The front was a shimmery color.
I fit 6 of these patters.
The outer edge I cut with special scissors called Pinking Shears.
They're scissors with a design on the blade instead of a straight one.

To assemble, take a cupcake pan and adjust the paper so it fits inside one of the molds and tape the ends together with a clear tape (I think I used clear packaging tape because it's much stronger than regular tape.)

The mom, Becky, wanted some signs on the cupcakes as well. Here's the process for making them.

I've used toothpicks in the past for signs but when I was at Smart and Final shopping for supplies I found these hamburger picks.
It came in a 3 pack with 750 picks IN EACH BOX!
I only needed 80. They worked beautifully though. The flat picks were easier to work with than the round toothpicks.

For the front part of the sign I used a paper called vellum (8.5"x11"). It's a thick and transparent paper.
My secret on getting these perfect squares?? EXCEL baby. I love that program! It has so many uses.. I have no idea how I did without it for so long!

Here are the specifications I used to get 49, 1"x1.5" boxes (after trimming):
Column Width: 14
Row Height: 110
Font: Pristina
Margins: as small as you can get it!
Borders: Dotted, Gray


I cut the top and bottom with a regular scissor and the sides of it I create a pretty pattern with these scissors.

For the back I got a cardstock paper that was a lovely shade of blue and green that matched the theme and did the same with these specifications:

Column Width: 19.57
Row Height: 110
Font: No writing!
Margins: as small as you can get it!
Borders: Dotted, Gray

These you get 35, 1.5"x1.5" squares (trimmed).

Same cutting process then I glued the vellum on with two dots of tacky glue.

Same stuff I used to glue the sticks to the sign. A TIP when doing mass producing: Always do like actions all at the same time.

For example, gluing the sticks to the sign. Lay out all the sticks (or at least as many as you can before the glue starts to dry out), put the glue on all at once, then stick it on the sign all at once. This is how the pros work so fast! If they spent time doing each item all at once before moving on to the next it would take FOREVER!!!

After I put the sticks on I realized that there was this ugly clear dot where the glue had dried.

It bugged me so I put a dot of this glitter glue that I already had to make it look like a little bling.

Much better!

Turned out pretty well! The hand-made liners really do make a difference! I'm glad I did it... though it took me so long just to figure out the correct pattern!

Here's the family! So cute they all are...


This is my favorite picture.

Tuesday, December 15, 2009

A Measuring Cup That's Also a Scale??

I get this newsletter called The Tasting Table and in a recent one there was a feature on cool gadgets. One of them was this super cool measuring cup.


You can easily switch from fluid oz to weight and to volume! It's genius!

Sunday, December 13, 2009

Christmas Wreath and Holly Berries Cupcakes


Continuation of the group of Christmas Cupcakes.

For this Christmas Wreath get some icing and color it green. Ice the top of the cupcake with a white icing and make the top very smooth.

Next, take the pastry bag and cut a "V" or an "A". Either one is fine.


Then pipe leafs all along the outer edge of the cupcake.
I guess the trick to this would be to squeeze and slowly loosen your grip and you pull the leaf out.


Do a second layer right on top of the first.

Do a third row if you'd like. Then, add some pearl sprinkles and that's it!
You could also do the same with RED ICING and make POINSETTIAS or use YELLOW/ORANGE ICING and make SUNFLOWERS.

For the Holly Berries, I'm not even going to show a step by step.. this is obvious why right??

So instead I'll show what I used.


As you can see I got both of these at Walgreens. A tip for the leaves, I cut one of them in half like sandwich bread because one is way too thick.

Friday, December 11, 2009

Christmas Tree Cupcake

This Christmas Tree Cupcake is SUPER easy.

I used star candies I found at Party City and pearl sprinkles I found at Target (it was the cheapest I found).


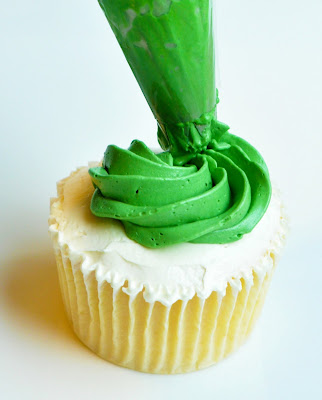
Ice the top of a cupcake. Get some green icing and place it in a pastry bag fitted with a star tip. The bigger the star tip.. the better.

Start a big circle.


Then swirl on top of the circle but pipe smaller circles as you go up.


Add pearl sprinkles.

Take a long star candy (or any other star candy you can find) and measure it so that the stick will go all the way to the bottom of the cupcake (the candy is top-heavy and needs something to support its weight).

That's it!

Saturday, December 5, 2009

Mr. Marshmallow Snow Man

This is a continuation from the Christmas present cupcakes blog I did a few weeks back. There will be a series of these as they were all done for a church event I helped to organize for a teen shelter. Tonight a few of the ladies at my church went to do a Christmas Cupcake Decorating Workshop. Overall I think it went well. The ladies seemed to be having fun. Unfortunately, I couldn't take any pictures due to privacy for the residents there but these Christmas Cupcakes were all prepared for this purpose.

As I mentioned in my previous post these ideas were taken from Martha Stewart's Cupcake Cookbook. There was a snowman cupcake in the book that was pretty plain. So I added my flair to it.

Here are the items I used for the following instructions to make a snowman cupcake:

Snowman: Jumbo Marshmallows

Snowman's Eyes, Buttons, and Hat Rim: Brown Jimmies (Sprinkles)


Snowman's Nose: Orange Slices
Scarf: Sour Belts

Hat: Rolos

Snow: Crystal Sugar


Take a cupcake and ice the top in a messy fashion.


Grab 2 jumbo marshmallows and cut one in half horizontally.


Stick the smaller marshmallow on top of the other using a little buttercream to paste it together.
Then taking a toothpick poke holes for the eyes, nose, and buttons.
TIP: Wet the toothpick so it doesn't stick.


Take some brown Jimmies (the longer ones work better) and stick them into the eyes and buttons.
For the nose, cut a small piece of any orange candy.


Take some crystal sugar and sprinkle it all over the OUTER RIM of the iced cupcake. Try to avoid getting it in the center as the snow man will go there and will not stick well if there is a layer of sugar on top of the buttercream.


For the scarf, take a sour belt candy and cut it in half horizontally and vertically... but more even and prettier than what I had done.


Use a good amount of buttercream to put all around the neck of the snowman and attach the scarf.
Place the snowman on top of the cupcake.

For a snazzy-er scarf fold the second half of the sour candy and slip it into the scarf.


For the hat put some buttercream all along the rim of a Rolo chocolate candy. I keep the foil on because I have warm hands and tend to melt the chocolate before I can get it on the snowman.

Dip it into the brown Jimmies.


Add more buttercream on top of the snowman's head and place the Rolo on top.

Too cute, no? Bravo Martha Stewart's people for the base of this creation.


Instructions for the wreath, Christmas Tree, and Holly Berries coming soon.